Hydroponic Farming 101 and Benifits

What is the Hydroponics?

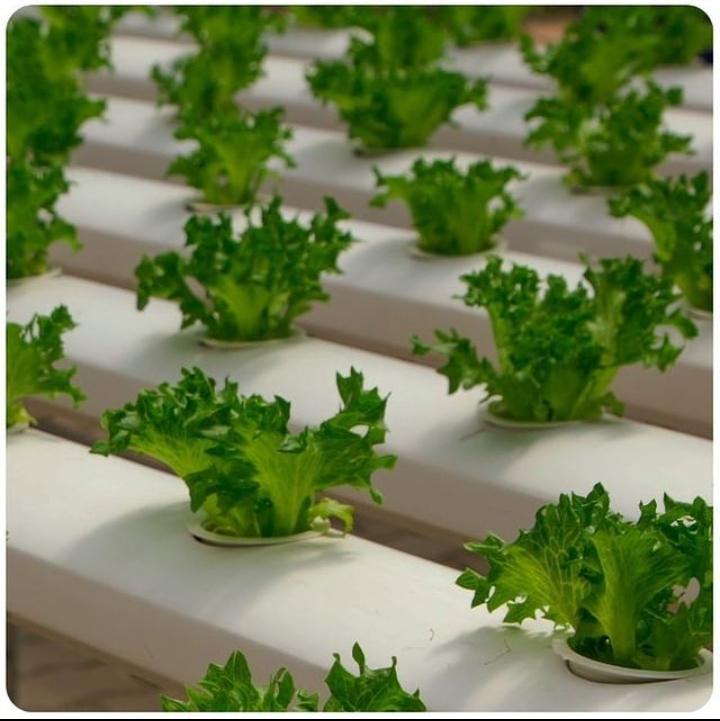
Hydroponics is a method of growing plants without soil. Instead, it involves using a nutrient-rich water solution to supply the necessary minerals and nutrients to the plants. The roots of the plants are submerged in the water solution or supported by an inert medium like perlite or clay pellets. This controlled environment allows for efficient water and nutrient uptake, resulting in faster plant growth and higher yields compared to traditional soil-based cultivation. Hydroponics is often used in greenhouse farming and indoor gardening.


 Here are 25 benefits of hydroponic farming:

1. Water Conservation: Hydroponic systems use significantly less water compared to traditional soil-based farming.

2. Space Efficiency: Hydroponics allows for vertical and compact farming, maximizing land use.

3. Higher Crop Yields: Controlled environments optimize plant growth, leading to increased yields.

4. Year-Round Production: Hydroponics enables continuous cultivation regardless of seasonal limitations.

5. Reduced Pest and Disease Risks: Soilless environments minimize the risk of soil-borne pathogens.

6. No Soil Erosion: Hydroponics eliminates erosion concerns as there is no need for soil cultivation.

7. Faster Growth: Plants often grow faster in hydroponic systems due to constant access to nutrients.

8. Consistent Quality: Controlled conditions lead to consistent and superior crop quality.

9. Nutrient Control: Precise nutrient management ensures plants receive the optimal balance for growth.

10. Energy Efficiency: High-tech hydroponic setups can be designed for energy-efficient operations.

11. Reduced Weeding: Soilless systems eliminate the need for regular weeding.

12. No Chemical Runoff: Hydroponics reduces the risk of chemical runoff polluting water sources.

13. Less Labor-Intensive: Automated hydroponic systems can reduce the need for manual labor.

14. Soil Reclamation: Hydroponics can be practiced in areas with poor soil quality or contaminated land.

15. Reduced Pesticide Use: Integrated pest management is more feasible in controlled environments.

16. Urban Farming: Hydroponics enables farming in urban areas and on rooftops.

17. Resource Recycling: Nutrient solutions can be recycled, reducing waste.

18. Customized Environments: Tailored setups can meet specific plant requirements for optimal growth.

19. Crop Diversification: Various crops can be grown simultaneously in the same system.

20. Reduced Water Pollution: Hydroponics minimizes the release of agricultural chemicals into water sources.

21. Scalability: Hydroponic farms can be easily expanded or downsized based on demand.

22. Food Security: Hydroponics helps enhance food production and reduce reliance on imports.

23. Climate Resilience: Controlled environments protect crops from extreme weather events.

24. Minimal Land Disruption: Hydroponics can be implemented without extensive land clearing.

25. Educational Value: Hydroponics offers an opportunity for learning and research in agricultural practices.

These benefits demonstrate the potential of hydroponic farming to contribute to sustainable agriculture and food production.

Patio gardening in Moon phase plants

Patio gardening can be influenced by the moon phases, known as "moon phase planting." Some gardeners believe that planting and harvesting crops according to the moon's cycles can enhance plant growth and yield. For instance, planting root crops during the new moon and leafy greens during the waxing moon are common practices. However, scientific evidence supporting these beliefs is limited, and success may vary depending on various factors. If you're interested in moon phase planting, consider researching further and experimenting with it in your patio garden.
Sure, here are some details about patio gardening based on moon phases:

1. New Moon: During this phase, it's a good time to plant leafy greens and vegetables that produce above-ground, like lettuce, spinach, and herbs. It's believed that the increased gravitational pull during the new moon supports healthy root growth.

2. First Quarter Moon: This phase is suitable for planting fruiting plants, such as tomatoes, peppers, and beans. The gravitational pull is increasing, which encourages strong growth in these types of plants.

3. Full Moon: It's best to avoid planting during the full moon, as the energy is focused upward, which can result in weaker root development. Instead, use this time to tend to your existing plants, perform pruning, and fertilize.

4. Last Quarter Moon: The decreasing gravitational pull during this phase is ideal for planting bulbs, root crops like carrots and potatoes, as well as perennials. The energy is directed downward, promoting root growth and establishment.

Remember that moon phase gardening is a traditional approach, and while some gardeners believe in its benefits, scientific evidence may be limited. It's essential to consider other factors like local climate and weather conditions for successful patio gardening. Happy gardening!

Patio gardening Self Watering System

Patio gardening Self Watering

A patio gardening self-watering system is a convenient way to keep your plants hydrated without constant manual watering. 

It typically includes containers with built-in reservoirs or a drip irrigation setup that automatically delivers water to the plants as needed. 

It's a great solution for busy individuals or those who may have limited time to tend to their garden regularly.
A patio gardening self-watering system is designed to automatically water your plants, making it easier to maintain them. Here are the full details of such a system:

1. **Water Reservoir**: The system includes a water reservoir to store the water. It can be a large container placed below the soil level or incorporated into the planter itself.

2. **Watering Mechanism**: A wicking or capillary system is used to deliver water from the reservoir to the plant's roots. This can be achieved through a series of wicks, ropes, or water-absorbent materials that draw water up into the soil.

3. **Water Level Indicator**: Some systems come with a water level indicator to show you how much water is left in the reservoir, so you know when to refill it.

4. **Overflow Drainage**: An overflow drainage system prevents overwatering and ensures that excess water doesn't accumulate, which could lead to root rot.

5. **Planter or Container**: The planter or container houses the plant and the self-watering mechanism. It can be made of various materials like plastic, ceramic, or terracotta.

6. **Soil Mix**: Choosing the right soil mix is essential for the system's effectiveness. A mix that retains moisture but doesn't get waterlogged is ideal.

7. **Plant Selection**: Certain plants are better suited for self-watering systems. Look for plants that thrive in consistently moist soil.

8. **Installation**: The system is relatively easy to set up. Follow the manufacturer's instructions or guidelines to assemble and configure it correctly.

9. **Maintenance**: While the system reduces the frequency of manual watering, it still requires periodic maintenance. Regularly check the water level and refill the reservoir as needed. Also, clean the system to prevent clogs and ensure proper functioning.

10. **Benefits**: The self-watering system conserves water by providing only the necessary amount to the plants, reducing water wastage. 

It also helps maintain consistent moisture levels, leading to healthier plant growth.

Keep in mind that different brands or designs might have additional features or variations, but these are the fundamental aspects of a patio gardening self-watering system.

11 Steps in Patio gardening with Tropical Vines

Tropical gardening with tropical vines

Tropical gardening with tropical vines can add a lush and exotic touch to your garden. Consider plants like Bougainvillea, Passionflower, or Jasmine, which thrive in warm climates. Provide them with proper support and ensure they receive sufficient sunlight and water for healthy growth. Regular pruning will help control their spread and maintain an aesthetically pleasing garden.


Patio gardening with tropical vines can be a rewarding and beautiful experience. Here are some details to get you started:

1. **Choosing the Right Vines**: Select tropical vine species that suit your patio's conditions, such as Bougainvillea, Passionflower, or Mandevilla. Consider factors like sunlight, water requirements, and available space.


2. **Container Selection**: Opt for large, sturdy containers with good drainage to accommodate the growing needs of the vines. Ensure the pots are placed on stable surfaces to prevent accidents.


3. **Soil and Fertilizer**: Use well-draining, nutrient-rich soil. Regularly fertilize the vines with a balanced fertilizer to promote healthy growth and flowering.


4. **Sunlight**: Most tropical vines prefer full sun, so ensure your patio receives at least 6-8 hours of sunlight per day. If it's not possible, choose vines that tolerate partial shade.


5. **Watering**: Tropical vines generally require consistent watering, especially during hot months. Check the soil moisture regularly and adjust the watering frequency accordingly.


6. **Support and Trellis**: Provide sturdy supports or trellises for the vines to climb and spread. This not only enhances their aesthetics but also encourages better growth.


7. **Pruning**: Regular pruning is essential to keep the vines in shape and control their growth. Remove dead or diseased parts and trim back excess growth to encourage new blooms.


8. **Pest and Disease Control**: Monitor the vines for pests and diseases regularly. Apply appropriate treatments or remedies promptly to maintain their health.


9. **Mulching**: Mulch the soil around the vines to retain moisture and suppress weed growth.


10. **Overwintering**: In regions with colder temperatures, consider bringing the tropical vines indoors or protecting them from frost during the winter months.


11. **Companion Planting**: Consider planting other compatible flowers or herbs alongside the vines to create a harmonious and visually appealing patio garden.


Remember that different vine species have specific care requirements, so it's essential to research the needs of the particular tropical vines you choose. Enjoy the lush greenery and vibrant blooms that your patio garden will offer!


11 Steps of Tomato growing in patio gardening

Here are the steps to grow tomatoes in patio gardening:

1. **Selecting Tomato Varieties**: Choose tomato varieties that are suitable for container gardening and fit your patio space. Look for compact or dwarf varieties that thrive in pots.
2. **Choosing Containers**: Pick large, sturdy containers with good drainage holes to prevent waterlogging. A 5-gallon container is usually a good size for a single tomato plant.
3. **Potting Mix**: Use a high-quality potting mix with good drainage and aeration. Avoid using garden soil, as it may lead to poor growth and disease.
4. **Planting Seeds or Seedlings**: Start by planting tomato seeds indoors in small pots or trays. Once they germinate and grow into seedlings, transplant them into your larger containers. Alternatively, you can purchase tomato seedlings from a nursery and plant them directly.

5. **Sunlight**: Ensure your patio receives at least 6-8 hours of sunlight daily. Tomatoes require plenty of sunlight to grow and produce fruit.

6. **Watering**: Keep the soil consistently moist, but not waterlogged. Water the plants thoroughly when the top inch of soil feels dry to the touch.

7. **Support**: As the tomato plants grow, provide support such as stakes or cages to keep the stems upright and help prevent them from bending or breaking under the weight of the fruit.

8. **Fertilizing**: Feed your tomato plants with a balanced fertilizer according to the manufacturer's instructions. Avoid over-fertilization, as it can lead to excessive foliage growth at the expense of fruit production.

9. **Pruning**: Regularly remove suckers (small shoots that grow between the main stem and branches) to focus the plant's energy on fruit production.

10. **Pest and Disease Management**: Monitor your plants regularly for signs of pests or diseases. Treat any issues promptly to protect your tomato crop.

11. **Harvesting**: Once the tomatoes ripen, harvest them by gently twisting and picking them off the vine. Enjoy your homegrown tomatoes!

Remember, each variety may have specific requirements, so it's essential to follow the guidelines provided on the seed packet or plant label. Happy gardening!

Rose Black spot Disease identification and Treatment

Black spot disease, also known as black spot fungus, is a common fungal disease that affects roses (Rosa spp.) and other plants in the Rosaceae family. Here are the identification and treatment details for black spot disease:

Identification:

1. Black spotes in Leaves:
 The most noticeable symptom is the appearance of black or dark purple spots on the upper side of the leaves.


2. Yellowing of leaves: The infected leaves may turn yellow and drop prematurely, leading to defoliation.

3. Spreading: The disease can spread rapidly in humid conditions, especially during warm and wet weather.

Treatment:

1. Pruning: Start by removing and disposing of infected leaves, stems, and flowers to prevent further spread of the fungus. Clean pruning tools between cuts to avoid transmitting the disease to healthy parts of the plant.

2. Water management: Avoid overhead watering to keep the leaves dry, as moisture encourages fungal growth. Water the plants at the base to reduce splashing of fungal spores.

3. Improve air circulation: Plant roses and other susceptible plants with enough space between them to allow good air circulation, which helps reduce humidity around the foliage.

4. Fungicides: Apply fungicides specifically formulated for black spot disease prevention and treatment. Follow the manufacturer's instructions and apply at recommended intervals.

5. Neem oil: Neem oil can also be effective against black spot disease. It acts as both a fungicide and an insecticide.

6. Disease-resistant varieties: Consider planting disease-resistant rose varieties, as they are less susceptible to black spot and other fungal diseases.

Remember, prevention is essential in managing black spot disease. Regularly inspect your plants for any signs of infection and take appropriate action promptly to limit the spread of the fungus.

wildlife friendly patio gardening

What is the patio gardening?

Caring for potted plants on your patio involves regular watering, providing adequate sunlight, and occasional fertilization. Make sure to check the specific care requirements for each plant species to ensure they thrive. Pruning and removing dead leaves can also help keep the plants healthy.

Creating a wildlife-friendly patio garden involves several steps. Here are some full details to guide you:

1. **Selecting Plants:** Choose a variety of native plants that attract wildlife such as birds, butterflies, and bees. Consider nectar-rich flowers, berry-producing shrubs, and plants that provide shelter and food for insects.
2. **Plant Containers:** Use containers made of natural materials like clay or wood to provide a more authentic environment for wildlife. Ensure the containers have drainage holes to prevent waterlogging.
3. **Soil and Compost:** Use organic and chemical-free soil and compost to ensure a healthy environment for both plants and wildlife.

4. **Water Source:** Incorporate a small birdbath, shallow dish, or a water feature to provide a water source for birds, insects, and other small animals.

5. **Avoid Chemicals:** Refrain from using pesticides, herbicides, or chemical fertilizers, as they can be harmful to wildlife. Opt for natural alternatives like neem oil or companion planting.

6. **Create Hiding Spots:** Add rocks, logs, and small brush piles to offer hiding spots and shelter for wildlife, including beneficial insects.

7. **Bird Feeders:** Hang bird feeders to attract different bird species. Use a mix of seeds and nuts to cater to various preferences.

8. **Butterfly and Bee Houses:** Install butterfly and bee houses to provide nesting spots and protect them during colder months.

9. **Maintain a Variety of Heights:** Incorporate plants of different heights, from groundcovers to taller shrubs, to accommodate a diverse range of wildlife.

10. **Regular Maintenance:** Regularly tend to your patio garden, remove dead plants, and ensure the water sources remain clean and filled.

11. **Educate Yourself:** Learn about the local wildlife in your area to better understand their needs and how to support them effectively.

12. **Monitor and Enjoy:** Spend time observing the wildlife that visits your patio garden. Keep a record of the species you encounter and make adjustments as needed to better suit their preferences.

By following these steps, you can create a vibrant and wildlife-friendly patio garden that benefits both the local ecosystem and your outdoor space. Happy gardening!

10 Patio gardening Pests

Sure, here are some common patio gardening pests with full details:
1. Aphids: Small, soft-bodied insects that feed on plant sap, causing leaves to curl and distort. They reproduce rapidly, so early detection is crucial.

2. Whiteflies: Tiny, winged insects that cluster on the undersides of leaves. They suck plant juices, causing yellowing and weakening of the plant.

3. Spider Mites: Minuscule arachnids that feed on plant cells, leading to stippling, yellowing, and webbing on leaves.

4. Slugs and Snails: Nighttime feeders that leave slime trails and chew on leaves, stems, and fruits.

5. Caterpillars: Larvae of moths and butterflies that can devour foliage and fruits, leading to significant damage.

6. Thrips: Tiny, slender insects that feed on plant cells, causing silvery spots, curling, and distorted growth.

7. Mealybugs: Soft, cottony insects that suck sap and excrete honeydew, leading to mold growth and weakened plants.

8. Scale Insects: Small, immobile pests that form protective shells on stems and leaves while sucking plant sap.

9. Leafhoppers: Jumping insects that feed on plant sap, resulting in stippling and yellowing of leaves.

10. Japanese Beetles: Metallic green beetles that skeletonize leaves, feeding in groups.

Preventing pest infestations involves maintaining garden hygiene, using natural predators, and employing organic or chemical treatments when necessary. Regularly inspecting plants can help catch infestations early and prevent further damage.

Shady patio plants in gardening

Sure! Here are some shade-loving plants that you can consider for your shady patio, along with their full details:

1. Ferns: Ferns are popular for their lush, feathery foliage and thrive in low-light conditions. They prefer moist, well-draining soil and can add a touch of elegance to your patio with their unique fronds.


2. Hostas: Hostas are known for their attractive and large leaves, which come in various shades of green, blue, and even variegated patterns. They prefer partial to full shade and require consistent moisture.


3. Impatiens: These colorful annual flowers brighten up shady areas with their vibrant blooms in shades of pink, red, orange, and white. They are easy to grow and can tolerate humidity and moist soil.


4. Begonias: Begonias are another popular choice for shady patios, offering a wide range of colors and textures. They can be grown as annuals or perennials, depending on the climate, and prefer well-draining soil.


5. Caladiums: Caladiums are known for their stunning heart-shaped leaves with vibrant patterns in shades of pink, red, white, and green. They prefer a warm and humid environment, making them suitable for shady patios with a bit of warmth.


6. Heucheras (Coral Bells): These perennial plants have attractive foliage in a variety of colors, including green, purple, and silver. They tolerate shade well and can add interest to your patio with their unique leaf shapes.


7. Coleus: Coleus plants come in a wide array of colorful and patterned leaves, making them an excellent choice for adding visual interest to your shady patio. They prefer well-draining soil and regular watering.


8. Fuchsias: Fuchsias are stunning flowering plants with pendulous blooms in shades of pink, purple, and white. They thrive in partial shade and require consistent moisture to flourish.


9. Astilbes: Astilbes are perennials that produce feathery plumes of flowers in various colors, including pink, red, and white. They prefer moist soil and can be a lovely addition to a shady patio garden.


10. Lamium (Dead Nettle): Lamium is a ground cover plant with variegated foliage and small, delicate flowers. It's a low-maintenance option for shady areas and can spread to create a lush carpet-like effect.


Remember to consider your specific climate and patio conditions when choosing these plants. Providing adequate water, appropriate soil, and some occasional fertilization will help your shade-loving plants thrive and turn your shady patio into a beautiful and inviting outdoor space.

Patio gardening Repurposing items in decoration

Repurposing items in decoration 

Certainly! Repurposing items for patio gardening decoration is a great way to add a unique touch to your outdoor space. 

10 ways for patio gardening decoration:

1. **Old Containers**: Transform old containers like buckets, crates, or even tires into creative planters. Make sure to drill drainage holes and paint them for added visual appeal.
2. **Pallet Planters**: Convert wooden pallets into vertical planters by filling the gaps with soil and adding plants. This saves space and looks charming.
3. **Broken Pots**: Instead of throwing away chipped or broken pots, use them for a whimsical "broken pot garden" effect. Layer the pieces and plant various succulents or herbs among them.
4. **Garden Tool Decor**: Hang old garden tools like shovels, rakes, and watering cans on the patio walls to create a rustic and functional decoration.
5. **Upcycled Furniture**: Repurpose old furniture like chairs or tables by converting them into plant stands. Paint or refinish them to match your patio's theme.
6. **Rain Gutter Garden**: Utilize old rain gutters as horizontal planters attached to the patio's railing or walls.

7. **Teacup Planters**: Give old teacups or mugs a new life by planting small flowers or herbs in them. They make adorable additions to any patio garden.

8. **Wine Bottle Planters**: Cut wine bottles in half and use the bottom parts as unique planters for succulents or small herbs.

9. **Birdcage Planters**: Repurpose vintage birdcages by filling them with soil and planting trailing or cascading plants for a charming hanging planter.

10. **Terrariums**: Reuse glass jars or fish tanks to create beautiful terrariums with moss, small plants, and decorative elements.

Remember to clean and prepare the items properly before using them as planters, ensuring they are safe for your plants. Happy patio gardening and decorating!

Acephate 75 Sp pesticides uses /Acephate dosage per acre/Acephate attack instidces

Acephate 75 Sp uses  contains 75% active ingredient acephate, which is an organophosphate compound. This insecticide is known for its broad-...